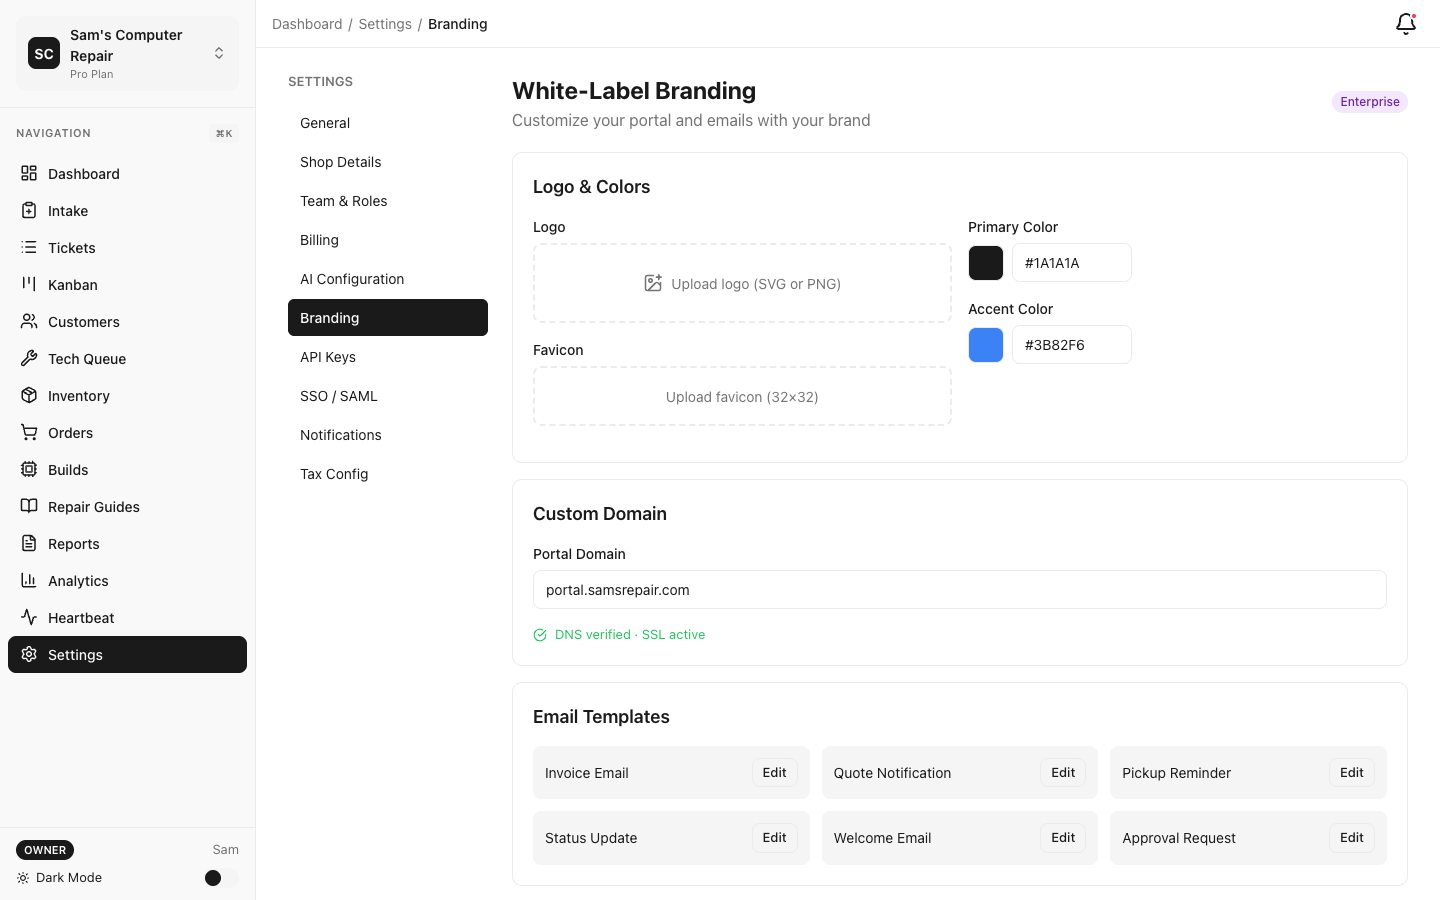
White-Label Branding
Customize RepairOps with your shop’s branding. Set a custom domain, upload your logo, configure colors, and brand outbound emails. Create a fully white-labeled experience for your team and customers.
Available on: Enterprise tier only.

Custom Domain
Section titled “Custom Domain”Use your own domain (e.g., repairs.yourshop.com) instead of yourshop.repairops.io.
Setting Up a Custom Domain
Section titled “Setting Up a Custom Domain”- Navigate to Settings → Branding → Custom Domain
- Enter your domain name (e.g.,
repairs.yourshop.com) - Add DNS records (CNAME or A records) as indicated:
- CNAME: Point
repairs.yourshop.com→yourshop.repairops.io(easiest) - A Records: Point directly to RepairOps IP (if required by your DNS provider)
- CNAME: Point
- Click Verify Domain
- RepairOps checks DNS propagation and activates custom domain
SSL/TLS Certificate
Section titled “SSL/TLS Certificate”RepairOps automatically provisions a free SSL certificate (via Let’s Encrypt) for your custom domain:
- Issued automatically upon verification
- Auto-renews every 90 days
- No additional configuration needed
Your site is immediately HTTPS and secure.
Email from Custom Domain
Section titled “Email from Custom Domain”Outbound emails from RepairOps appear to come from your domain:
- From: noreply@yourshop.com (instead of noreply@repairops.io)
- Requires SPF/DKIM configuration (see below)
SPF & DKIM Configuration
Section titled “SPF & DKIM Configuration”For emails to be trusted, configure SPF and DKIM records:
SPF Record
Section titled “SPF Record”Add to your DNS:
v=spf1 include:repairops.io ~allRepairOps provides DKIM public key. Add to your DNS:
CNAME: default._domainkey.yourshop.com → repairops._domainkey.repairops.ioThese prevent email spoofing and improve deliverability.
Logo & Colors
Section titled “Logo & Colors”Logo Upload
Section titled “Logo Upload”Upload your shop’s logo:
- Settings → Branding → Logo
- Click Upload Logo (PNG, JPG, or SVG)
- Logo must be at least 200x50px
- RepairOps auto-scales for different contexts:
- Header (typically 40px tall)
- Login page (typically 100px tall)
- Mobile (smaller screen versions)
Your logo appears in:
- Header navigation (staff app and customer portal)
- Email headers
- Customer portal
- Login page background
Color Scheme
Section titled “Color Scheme”Customize the color palette:
-
Settings → Branding → Colors
-
Set primary brand colors:
- Primary Color — Main accent (buttons, links, headers)
- Secondary Color — Supporting accent
- Success Color — For positive/completed states (default: green)
- Error Color — For errors/failures (default: red)
- Text Color — Main text (default: dark gray)
- Background Color — Page background (default: white)
-
Preview updates in real-time
-
Save when satisfied
Accessibility: Choose colors with sufficient contrast for accessibility. RepairOps calculates WCAG contrast ratio (minimum AA required).
Email Template Branding
Section titled “Email Template Branding”Customize transactional emails to match your branding:
Email Header
Section titled “Email Header”- Settings → Branding → Email Templates
- Set Email Header Background Color
- Upload Email Logo (appears in header)
- Set Email Header Text Color (e.g., white for dark backgrounds)
Footer
Section titled “Footer”- Set Footer Text (e.g., “Thank you for choosing [Shop Name]!”)
- Set Footer Link Color
- Add social media links (optional)
- Facebook, Instagram, Twitter, etc.
- Links appear in email footer
Custom Footer Text
Section titled “Custom Footer Text”Add closing text to all emails:
Best regards,[Shop Name] Repair Team123 Main Street[City], [State] [ZIP][Phone]Use [Shop Name] placeholder; RepairOps auto-fills organization name.
Email Template Preview
Section titled “Email Template Preview”Before finalizing, preview how emails look:
- Settings → Branding → Email Templates → Preview
- See examples of:
- Invoice email (with branding)
- Appointment reminder (with branding)
- Password reset (with branding)
- Notification emails (with branding)
Verify:
- Logo displays correctly
- Colors are readable
- Links are clickable
- Mobile rendering looks good
Portal Branding
Section titled “Portal Branding”The customer portal automatically uses your branding:
- Logo in portal header
- Primary color for buttons and links
- Custom domain (if configured)
- Custom email footer
Customers see a fully branded experience when:
- Receiving invoice emails
- Accessing estimate approval link
- Viewing repair status
- Receiving payment reminders
Help Center Branding (Optional)
Section titled “Help Center Branding (Optional)”If you use RepairOps’ self-hosted Help Center:
- Settings → Branding → Help Center
- Configure:
- Help Center Domain — e.g.,
help.yourshop.com - Logo — Same as app logo (or different if preferred)
- Colors — Can match or differ from app branding
- Help Center Domain — e.g.,
Help Center articles are then hosted on your custom domain with your branding.
Mobile App Branding
Section titled “Mobile App Branding”If using RepairOps mobile app (for technicians):
- Settings → Branding → Mobile App
- Your logo and colors automatically appear in mobile app
- Apps can be white-labeled or still branded as “RepairOps”
Custom splash screen and app icon can be added (contact support).
Favicon & Browser Tab
Section titled “Favicon & Browser Tab”Customize the browser tab appearance:
- Settings → Branding → Favicon
- Upload a small icon (16x16 or 32x32 PNG)
- Icon appears in browser tab when RepairOps is open
This reinforces branding when users have multiple tabs open.
Invoice Branding
Section titled “Invoice Branding”Invoices automatically use your branding:
- Logo at top of invoice
- Company colors in headers
- Custom footer text
- Custom domain email sender
No separate configuration needed; invoices use settings from above.
Brand Assets
Section titled “Brand Assets”Downloading Brand Assets
Section titled “Downloading Brand Assets”RepairOps can generate brand guidelines:
- Settings → Branding → Export Brand Guide
- Generate a PDF with:
- Logo (in various formats and sizes)
- Color palette (RGB, HEX, CMYK values)
- Fonts used
- Typography guidelines
- Email template specs
- Spacing and sizing standards
Share this with contractors or developers if they need to build integrations matching your brand.
Multiple Branding (Multi-Organization)
Section titled “Multiple Branding (Multi-Organization)”If you have multiple organizations (rare but supported):
- Each organization has separate branding settings
- Users switching between organizations see different logos/colors
- Invoices generated from Organization A show Organization A’s branding
This is useful for multi-brand franchises or corporate rollups.
Reverting to RepairOps Branding
Section titled “Reverting to RepairOps Branding”To switch back to default RepairOps branding:
- Settings → Branding → [Setting Name] → Reset to Default
- Confirm
All custom branding is removed and replaced with RepairOps defaults. Your data is not affected.
Branding Best Practices
Section titled “Branding Best Practices”Test thoroughly — Before going live with custom branding, test:
- Logo loads correctly in all contexts (header, email, mobile)
- Colors meet accessibility standards (WCAG AA contrast)
- Custom domain DNS propagates globally (test from different locations)
- SPF/DKIM configured (test email deliverability)
- Mobile app renders correctly
- Invoices print correctly with colors
Use consistent branding — Keep logo, colors, and fonts consistent across:
- RepairOps UI
- Customer portal
- Emails
- Physical locations (match any offline branding)
Monitor email deliverability — After custom domain setup:
- Monitor spam folder for test emails
- Check DKIM/SPF records are correct
- Request customers add your domain to contacts (improves deliverability)
Update periodically — If your shop rebrands:
- Update logo in RepairOps
- Update colors
- Update email footer text
- Consider creating a “Brand Launch” communication to team
Troubleshooting
Section titled “Troubleshooting”Logo is distorted or pixelated
- Ensure logo is high resolution (at least 1000x250px)
- Use SVG if possible (scales to any size without loss)
- Try uploading a PNG instead of JPG
Custom domain won’t verify
- Wait 24-48 hours for DNS propagation
- Check DNS records are exactly as specified
- Use online DNS checker (e.g., MXToolbox) to verify
- Contact support if DNS propagation seems stuck
Emails not sending from custom domain
- Verify SPF and DKIM records are correct
- Wait 24 hours after DNS changes
- Test with Send Test Email in branding settings
- Check spam folder (may be marked as spam initially)
Colors look different than expected
- Different screens/monitors display colors differently
- Verify contrast in Branding → Colors → Preview
- Test on multiple devices (phone, tablet, desktop)
Related Documentation
Section titled “Related Documentation”- Security — SSL certificates, domain security
- Admin Overview — Other Enterprise features