SSO / SAML
Single Sign-On (SSO) integration allows your team to log into RepairOps using your organization’s identity provider. Streamline user provisioning, enforce security policies, and reduce password management overhead.
Available on: Enterprise tier only.
Supported Identity Providers
Section titled “Supported Identity Providers”RepairOps supports SAML 2.0 and OIDC (OpenID Connect):
SAML 2.0
Section titled “SAML 2.0”- Azure AD / Microsoft Entra ID
- Okta
- JumpCloud
- Auth0
- Google Workspace
- Ping Identity
- OneLogin
- Custom SAML providers
OIDC (OpenID Connect)
Section titled “OIDC (OpenID Connect)”- Any OIDC-compliant provider (Auth0, Google, Okta, etc.)
- Some providers support both SAML and OIDC — check your provider

Setting Up SAML 2.0
Section titled “Setting Up SAML 2.0”Step 1: Gather RepairOps Metadata
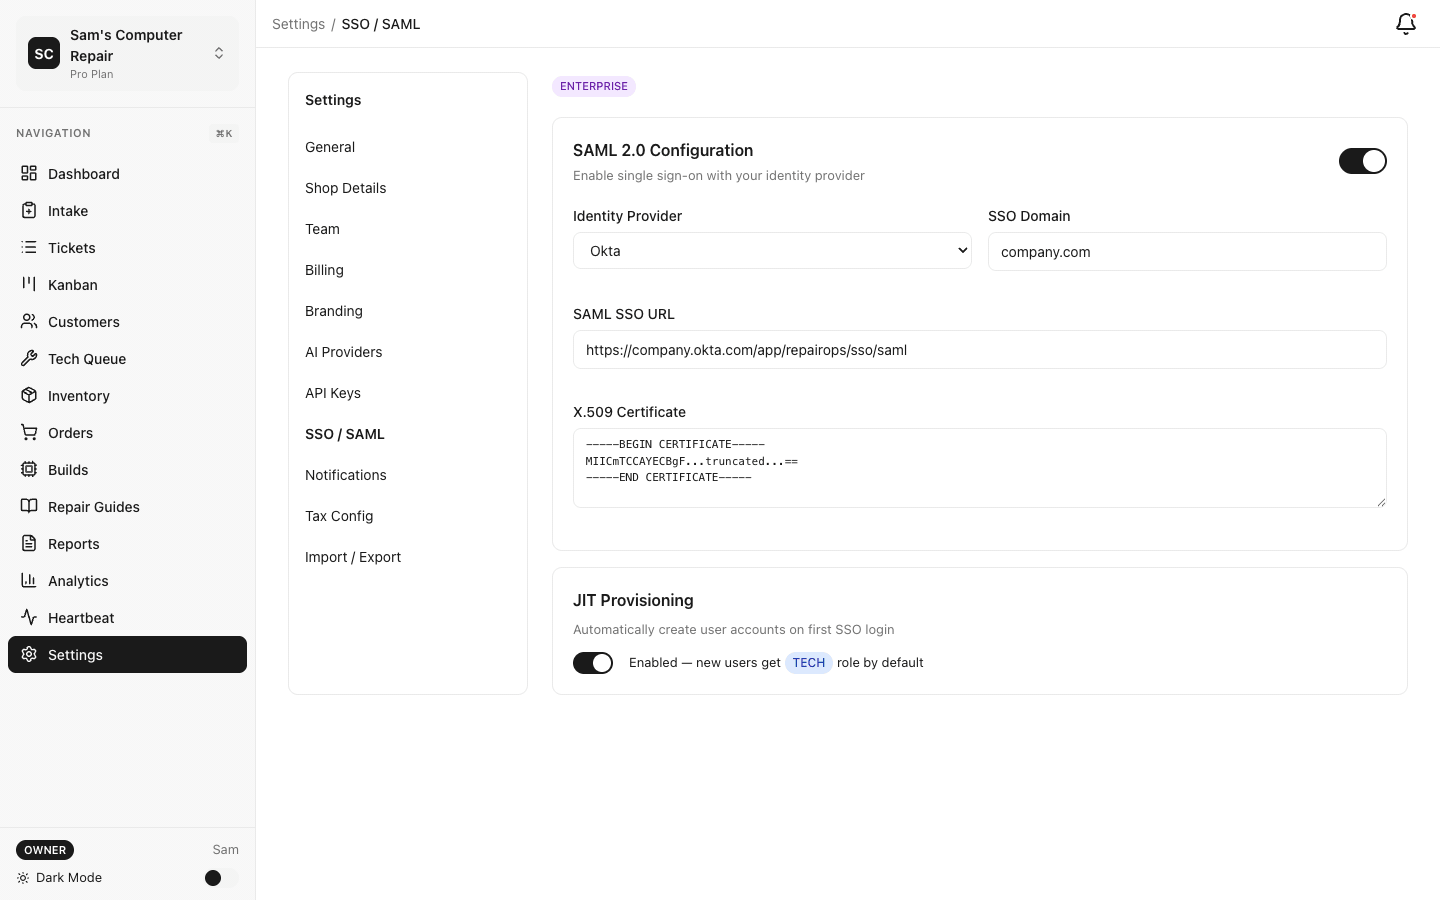
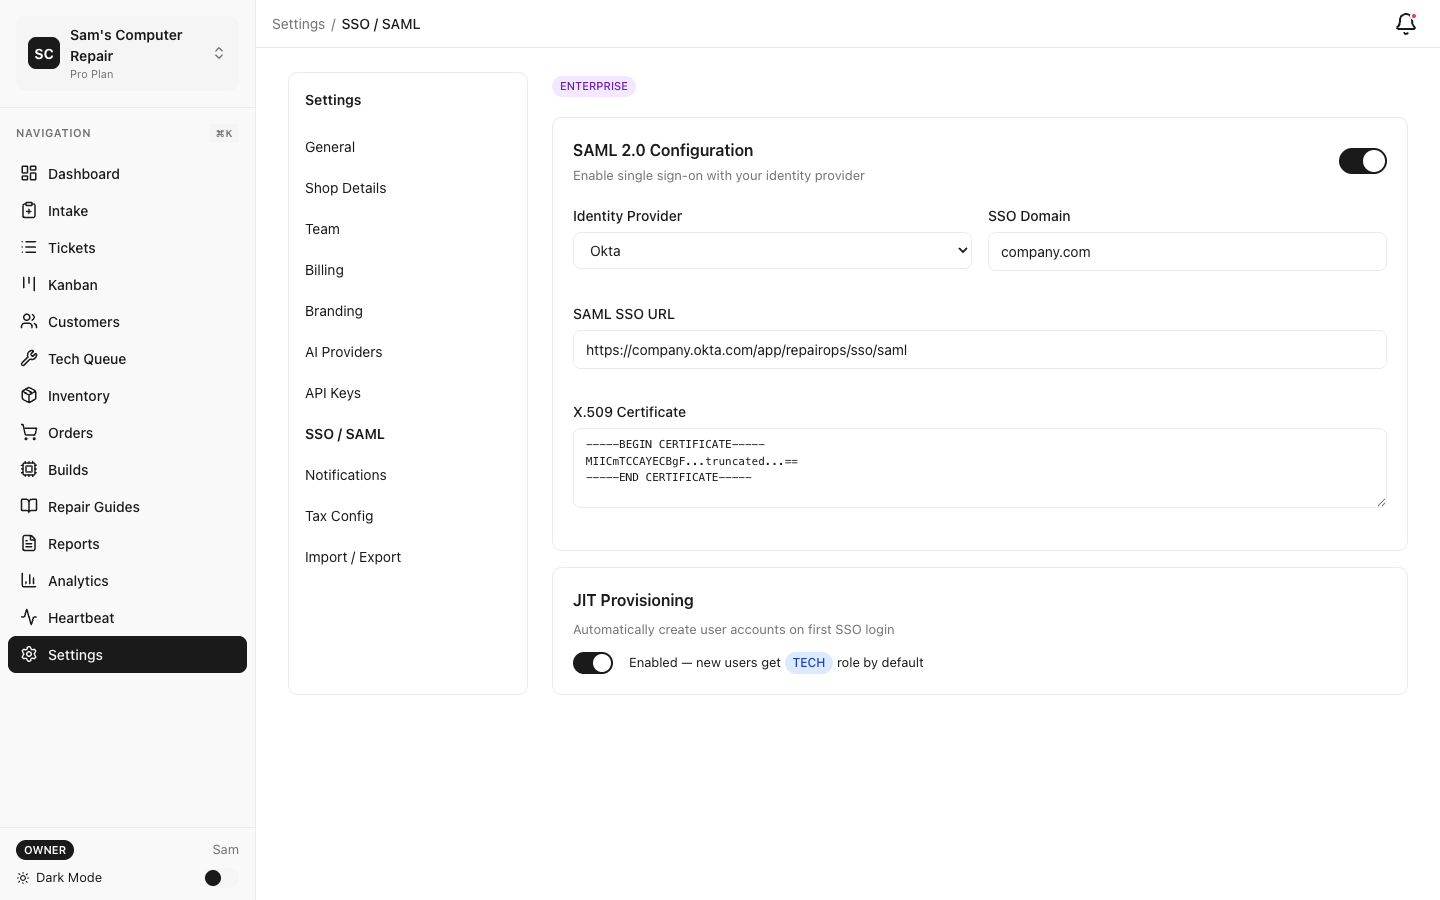
Section titled “Step 1: Gather RepairOps Metadata”- Navigate to Settings → Authentication → SSO
- Click Set Up SAML 2.0
- Copy your:
- Assertion Consumer Service URL (ACS) — Where your IdP will send the SAML response
- Entity ID — Unique identifier for RepairOps in your IdP
- Metadata URL — Full metadata document (share with your IdP)
Save these values; you’ll enter them in your identity provider.
Step 2: Configure Identity Provider
Section titled “Step 2: Configure Identity Provider”Log into your identity provider’s admin panel and add RepairOps as an application:
Azure AD / Microsoft Entra ID
Section titled “Azure AD / Microsoft Entra ID”- Azure AD → Enterprise Applications → New Application
- Search for “RepairOps” or Create your own application
- In SAML-based Sign-on, enter:
- Identifier (Entity ID):
[your-org].repairops.io - Reply URL (ACS): (paste from RepairOps)
- Sign on URL:
https://[your-org].repairops.io/sso/login
- Identifier (Entity ID):
- Under SAML Signing Certificate, copy the Certificate (raw)
- Copy Login URL and Logout URL
- Save in Azure AD
- Applications → Create App Integration → SAML 2.0
- Enter app name (e.g., “RepairOps”)
- In SAML settings:
- Single sign-on URL: (paste ACS from RepairOps)
- Entity ID: (paste Entity ID from RepairOps)
- Name ID format: EmailAddress (or matches your setup)
- Application username: Email
- Assign users/groups to the app
- View your metadata or certificate in the Sign On tab
Google Workspace
Section titled “Google Workspace”- Admin Console → Security → Set up single sign-on (SSO) with third-party IdP
- Check Enable SSO for my organization
- Upload RepairOps metadata or enter:
- Sign-in page URL: (from RepairOps, usually your ACS)
- Sign-out page URL: (from RepairOps)
- Change password URL: (leave blank unless you have a custom page)
- Download and save the certificate
Step 3: Add Signing Certificate to RepairOps
Section titled “Step 3: Add Signing Certificate to RepairOps”- In RepairOps SSO setup, scroll to Identity Provider Configuration
- Paste your IdP’s Signing Certificate (PEM format)
- Test the configuration with Test SSO
Step 4: Enable SSO
Section titled “Step 4: Enable SSO”- Click Enable SAML 2.0
- All users in your organization will now see “Sign in with [IdP]” button
- Magic link sign-in remains available as a fallback
Setting Up OIDC
Section titled “Setting Up OIDC”Step 1: Create OIDC Application in Your IdP
Section titled “Step 1: Create OIDC Application in Your IdP”Log into your identity provider:
- Applications → Create App Integration → OIDC - Web Application
- Enter RepairOps as the app name
- For Sign-in redirect URIs, enter:
https://[your-org].repairops.io/sso/callback - For Sign-out redirect URIs, enter:
https://[your-org].repairops.io/sso/logout - For Assignments, select which users/groups can access RepairOps
- Copy your Client ID and Client Secret
- Applications → Create Application → Regular Web Application
- Configure:
- Application URIs → Allowed Callback URLs:
https://[your-org].repairops.io/sso/callback - Allowed Logout URLs:
https://[your-org].repairops.io/sso/logout
- Application URIs → Allowed Callback URLs:
- Copy Client ID and Client Secret
- Google Cloud Console → APIs & Services → Create Credentials → OAuth 2.0 Client ID
- Application type: Web application
- Authorized redirect URIs:
https://[your-org].repairops.io/sso/callback - Copy Client ID and Client Secret
Step 2: Add OIDC Configuration to RepairOps
Section titled “Step 2: Add OIDC Configuration to RepairOps”- In RepairOps SSO setup, click Set Up OIDC
- Enter:
- Discovery URL (usually
https://[your-idp-domain]/.well-known/openid-configuration) - Client ID (from your IdP)
- Client Secret (from your IdP)
- Discovery URL (usually
- Test with Test SSO
Step 3: Enable OIDC
Section titled “Step 3: Enable OIDC”- Click Enable OIDC
- Users see “Sign in with [Provider]” button
- Magic link sign-in remains available as fallback
JIT User Provisioning
Section titled “JIT User Provisioning”Just-In-Time (JIT) provisioning automatically creates RepairOps user accounts when someone first logs in via SSO.
Enable JIT
Section titled “Enable JIT”- Settings → Authentication → SSO
- Check Automatic User Provisioning (JIT)
- Configure default settings for new users:
- Default Role: Tech, Front Desk, Manager, or Owner
- Default Shop: Which shop to assign new users to (if multi-location)
- Save
When someone logs in with SSO for the first time:
- RepairOps creates an account automatically
- Assigns them the default role
- Sends welcome email
Manual Provisioning (Alternative)
Section titled “Manual Provisioning (Alternative)”If you prefer to create accounts manually:
- Disable JIT
- Admins create accounts in Settings → Team → Invite Member
- SSO login only works for invited users
User Mapping & Attributes
Section titled “User Mapping & Attributes”Configure how IdP attributes map to RepairOps user fields:
- Settings → Authentication → SSO → Attribute Mapping
- Map these fields (if available from your IdP):
- Email ← email or mail (required)
- First Name ← givenName or given_name
- Last Name ← surname or family_name
- Department ← department (optional, used for team assignment)
- Manager ← manager (optional, for hierarchies)
Most providers send email by default; other attributes are optional.
Group Mapping (Advanced)
Section titled “Group Mapping (Advanced)”Sync IdP groups to RepairOps roles:
- Settings → Authentication → SSO → Group Mapping
- Map IdP groups to RepairOps roles:
- “engineering-team” (IdP) → “Tech” (RepairOps)
- “managers” (IdP) → “Manager” (RepairOps)
- “owners” (IdP) → “Owner” (RepairOps)
- When user logs in, their role updates based on group membership
This keeps your identity provider as source-of-truth for access control.
Logout & Session Management
Section titled “Logout & Session Management”Single Logout (SLO)
Section titled “Single Logout (SLO)”When a user logs out of RepairOps:
- RepairOps sends logout request to IdP
- User’s IdP session is also terminated
- User cannot access any apps without re-authenticating
Note: SLO requires IdP support (most modern IdPs support it).
Session Timeout
Section titled “Session Timeout”Configure inactivity timeout:
- Settings → Security → Session Management
- Set inactivity timeout (default: 30 minutes)
- User is logged out if inactive for this duration
Troubleshooting
Section titled “Troubleshooting”Users Can’t Sign In
Section titled “Users Can’t Sign In”Error: “SAML assertion failed validation”
- Check that signing certificate is correct (copy full PEM block, including headers)
- Verify Name ID format matches your setup (usually “Email Address”)
- Test with Test SSO button to see detailed error
Error: “User not found”
- If JIT is disabled, admin must first invite user (their email must match IdP email)
- If JIT is enabled, check that user’s email is correct in IdP
Group Mapping Not Working
Section titled “Group Mapping Not Working”- Confirm your IdP sends group claims in SAML assertion
- In Azure AD: add “groups” claim in SAML configuration
- In Okta: add “groups” to ID Token claims
- Test with Test SSO and review claims
Users See Magic Link Instead of SSO Button
Section titled “Users See Magic Link Instead of SSO Button”- SSO may not be enabled
- Settings → Authentication → SSO → Confirm “Enabled” toggle is on
- Hard refresh browser (Cmd+Shift+R on Mac, Ctrl+Shift+R on Windows)
Security Best Practices
Section titled “Security Best Practices”Enforce SAML/OIDC only — Disable magic link sign-in once SSO is working:
- Settings → Authentication → Sign-In Methods
- Uncheck Magic Link (SAML/OIDC only)
- Users must use corporate SSO
Use JIT with care — If enabled, anyone with an IdP account can create a RepairOps account:
- Recommended: Disable JIT and manually invite users
- Alternative: Enable JIT but restrict IdP app assignment to team members only
Audit SSO logins — Monitor sign-in activity:
- Settings → Security → Audit Log
- Filter by “SSO Login” events
- Alert on suspicious activity (logins from unusual locations, multiple failures)

Rotate client secrets — If using OIDC:
- Every 90 days, rotate your Client Secret in your IdP
- Update in RepairOps: Settings → Authentication → SSO
- Test SSO before completing rotation
Related Documentation
Section titled “Related Documentation”- Security — API keys, 2FA, audit logging
- Team Management — Adding users and assigning roles